This weekend, I've taken some big steps forward in my quest to join brisStyle. BrisStyle is an Etsy street team that brings together artists, crafters and designers who live in or near Brisbane and love to make handmade items. They hold various markets throughout the year where members fill stalls with their unique handmade goods and I've been looking forward to joining in the fun for a few months now.
In order to join brisStyle, you need to own an Etsy shop. So the first thing I had to do was to get my Etsy shop up and running and list at least ten items for sale. Now that I have my lighthouse, I've been able to get some really good quality photos and I used these to illustrate my items along with little descriptions including sizes. I had no idea how to price my items for this so I guess I'll just have to see how it all goes and adjust pricing as necessary.
But I'm excited to be able to show you my Etsy!! And I've now inquired about joining brisStyle - yay!
The other thing I decided to do was to give Inishkea its own Facebook page. That way, any friends or fans that want updates on new items, sales or where Inishkea items will be sold can 'like' the page and get my news feed. Hopefully this will make it easier for me to keep my friends and customers updated! You can check out the FB page here.
And now that all that is done, I can finally sit down to my clay table and do the really fun stuff :P
Sunday, 13 November 2011
Monday, 7 November 2011
Stroppel Wildfire
Here are links to some of my favourites:
Pavla Cepelikova used it on a hollow bead.
Cara Jane used a limited palette and white in her cane!
Rocky used it to make beautiful flower brooches.
Randee M. Ketzel has been busily making cool bangles and a tile bracelet.
Love the colours in Julie Doust's versions.
And of course Alice Stroppel herself is using the cane to dress her lovely girls!!!
There are so many more gorgeous examples, just google Stroppel Cane to find more!
And here are some of the things I've made with my first attempts at Stroppel Canes:
 |
| Stroppel Wildfire |
 |
| Stroppel Rings |
 |
| Stroppel Bead Necklace |
 |
| Organic Stroppel Earrings |
 |
| My new favourite earrings ;) |
Anyway, I adore this cane and have really enjoyed watching it spread throughout the polymer clay community. Thank you Alice Stroppel for your genius, creativity and generous spirit :D
Lighthouse
I've been knocking up a photo box to get a better lighting set up for photos of my jewellery, I call it my lighthouse. Cue one of my fave songs "Lighthouse" by The Waifs, that's what's playing in my head while I'm sawing and hammering away! I picked up some short lengths of timber, MDF and nails from Bunnings and a couple of white shower curtains from the cheapie shop. I made the box frame using the timber then nailed the MDF to the bottom and back surfaces. Then I cut up the shower curtain and glued it to the timber...eh voila...a home-built light box! I left the front and top open so photos could be taken from these two angles.
 |
| Image 1: My completed lighthouse!! |
Logo-licious!
Inishkea has a logo!!! My husband Todd and I came up with the idea for this and then he drew it up for me. The smaller one (Image 1), for earring cards and avatars, consists of an "I" on a round polymer clay bead. The larger one (Image 2) extends this to the full word "Inishkea," for banners and when I want the full name displayed. I'm so excited to have such a beautiful logo for my polymer clay collection! Thanks honey!!
 |
| Image 1: Inishkea logo (small) |
 |
| Image 2: Inishkea logo (large) |
Sunday, 23 October 2011
Adventure #15: Inishkea - Explorations in polymer clay
I have finally settled on a name for my polymer clay work..."Inishkea." Named for the island where my beautiful nana was born. The Inishkeas are two small islands off the coast of the Mullet peninsula in county Mayo, Ireland. The history of the islands is rich and intriguing and I couldn't think of a better name for my explorations in polymer clay! As such, I have also decided to re-title my blog "Inishkea - explorations in polymer clay." The old title wasn't really working for me any more as I don't seem to be doing much bead work but more really delving into different ways of using clay to express my ideas. So I hope you continue enjoying the blog under the new title!!
Adventure #14: Leather & Lace
For October, the Aussiepolyclayers challenge is 'lace'. The challenge is hosted by Esme, who's done an amazing job getting together inspirational links and tutes. See here for more details.
Esme defines lace as "any openwork structure whose pattern of spaces is as important as the solid areas." This revised definition of lace opened my mind to the possibilities of lace polymer clay work and inspiration followed, especially after a visit to the Powerhouse museum 'Make lace not war' exhibition website link included in Esme's post.
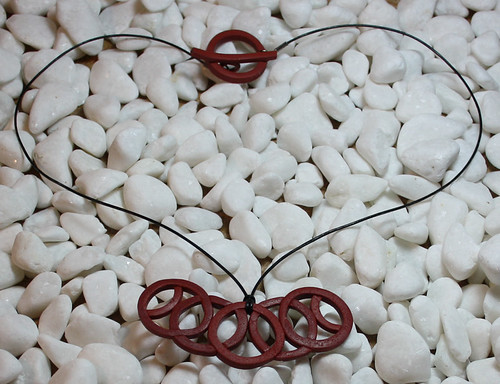
My first entry is entitled 'Celtic Lace' (Image 1). I've played with a few ways of using circles to make a lace effect. I combined orange and copper clay to get the lovely colour then used my extruder to make a long square 'snake' which was then cut up and moulded around a circular cookie cutter to get the round shapes. My mother-in-law loved it so much that she ordered a smaller version for herself! You can see that one here.
My second piece is a layered bangle (Image 2). The first layer is a solid black base, the second layer is a pretty skinner blend and the third layer is another thin black layer with lacey patterns cut out using tiny cookie cutters. I coated the bangle with pearlex varnish - I was pleased with the end result!
The third piece is inspired by one of my favourite songs "Leather and Lace"...love Stevie Nicks! Here I wanted to explore using lace to string a neckpiece. The pendant is based around the idea of two very different people standing face to face and finding what they need in each other...finding a strong and enduring love with each other. It is strung on both leather and lace! And capped off with a handmade S-clasp (Image 3).
The fourth piece is a wireworked neckpiece with delicate white polyclay flower shapes with a lacey pattern through both the clay chips and the wirework (Image 4).
Last and definitely least are these earrings (Image 5) made from some extruded clay circles (again playing with circles in getting lacey effects!).
And I'm spent! What a great challenge this has been, I've thoroughly enjoyed maself :P Check out the entire challenge thread here to see what amazing things the aussiepolyclayers are doing with lacey polymer clay.
Esme defines lace as "any openwork structure whose pattern of spaces is as important as the solid areas." This revised definition of lace opened my mind to the possibilities of lace polymer clay work and inspiration followed, especially after a visit to the Powerhouse museum 'Make lace not war' exhibition website link included in Esme's post.
My first entry is entitled 'Celtic Lace' (Image 1). I've played with a few ways of using circles to make a lace effect. I combined orange and copper clay to get the lovely colour then used my extruder to make a long square 'snake' which was then cut up and moulded around a circular cookie cutter to get the round shapes. My mother-in-law loved it so much that she ordered a smaller version for herself! You can see that one here.
 |
| Image 1: "Celtic Lace" |
My second piece is a layered bangle (Image 2). The first layer is a solid black base, the second layer is a pretty skinner blend and the third layer is another thin black layer with lacey patterns cut out using tiny cookie cutters. I coated the bangle with pearlex varnish - I was pleased with the end result!
 |
| Image 2: Layered Lace Bangle |
The third piece is inspired by one of my favourite songs "Leather and Lace"...love Stevie Nicks! Here I wanted to explore using lace to string a neckpiece. The pendant is based around the idea of two very different people standing face to face and finding what they need in each other...finding a strong and enduring love with each other. It is strung on both leather and lace! And capped off with a handmade S-clasp (Image 3).
 |
| Image 3: "Leather & Lace" |
The fourth piece is a wireworked neckpiece with delicate white polyclay flower shapes with a lacey pattern through both the clay chips and the wirework (Image 4).
 |
| Image 4: Delicate White Lace Necklace |
Last and definitely least are these earrings (Image 5) made from some extruded clay circles (again playing with circles in getting lacey effects!).
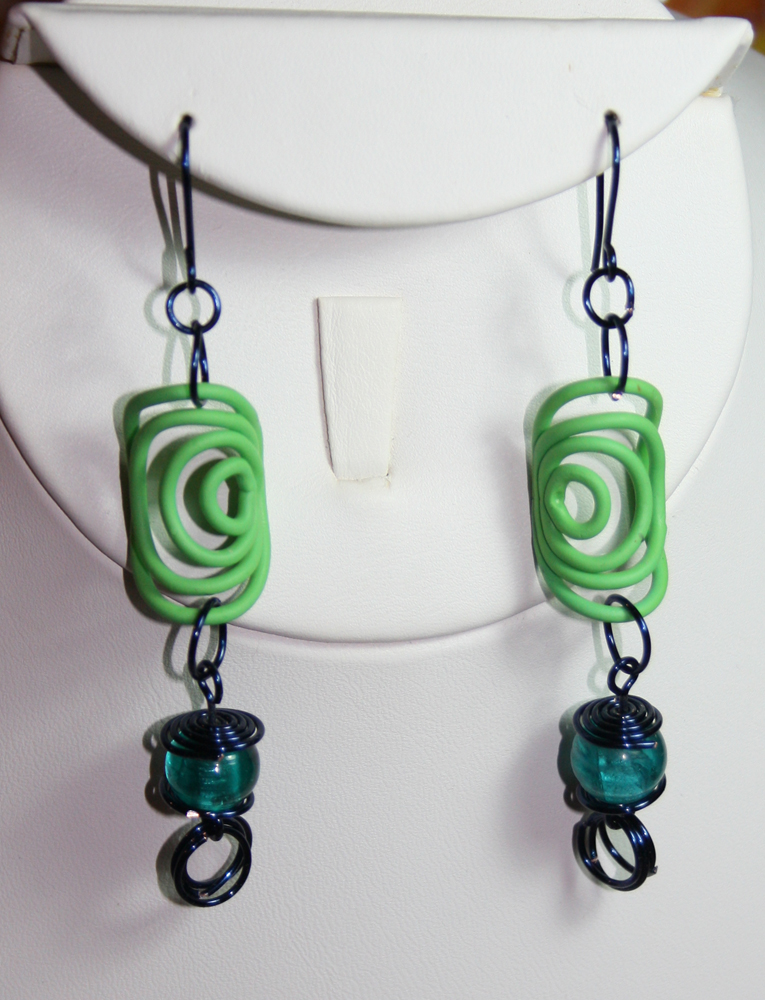 |
| Image 5: "Circles" earrings |
And I'm spent! What a great challenge this has been, I've thoroughly enjoyed maself :P Check out the entire challenge thread here to see what amazing things the aussiepolyclayers are doing with lacey polymer clay.
Tuesday, 11 October 2011
Adventure #13: My Grand Canyon
 |
| Image 1: The Grand Canyon bead in all its ugly glory! |
 |
| Image 2: Successful bubble bead #1 |
 |
| Image 3: Successful bubble bead #2 |
Subscribe to:
Posts (Atom)